Epidemic Simulation

BACKGROUND
A global outbreak of influenza in 1918 resulted in the deaths of over 50 million people. More than 25% of the world's population were infected with the disease and 3% of the world’s population died as a result. It is believed that the crowded living conditions that World War I soldiers were living in at the time accelerated the transmission of the disease. Increasing global travel was also a major factor in the worldwide spread of the disease. Another well-known epidemic was the sudden spread of the human immunodeficiency virus (HIV). First identified in the 1980s, the disease can cause AIDS and has been responsible for over 25 million deaths worldwide and now COVID-19 the new epidemic that we are living through today.
An infectious disease is a pathogen that is passed from one host to another. These diseases can spread through a diversity of ways; such as, direct contact with an infected individual, indirect contact via surfaces or objects touched by an infected individual, and airborne droplets that result from infected individuals sneezing, coughing or laughing. The transmission of disease through these droplets depends on how close the infected individual and potential host are, as the droplets disperse and settle quickly. The common cold and influenza are typically transmitted through droplets in the air. Local health departments, the World Health Organisation (WHO) and Centres for Disease Control (CDC) are responsible for monitoring infectious disease outbreaks. One of their responsibilities is to identify the source of outbreaks by tracking the routes of transmission. Over the past 100 years, these organisations, along with vaccine development and sanitation improvement, have effectively fought the spread of disease. Many of the infectious diseases that have historically been responsible for devastating epidemics have now been reduced or even eradicated.
In this investigation, students simulate the transmission of an infectious disease and work to determine the original source of the infection. Each student is given a vial filled with fluid, which they exchange with three other students to mimic transmission of disease. At the beginning of the investigation, one student is randomly given an ‘infected vial’. As the students exchange fluid from their vials, the fluid in the infected vial is spread from student to student. At the conclusion of the exchange, Phenol Red is used to indicate if each vial is infected or not. It will turn pink if the liquid has a pH greater than 8.4 and yellow in pH 6.8 or less. The ‘infected’ vials will subsequently appear pink or ‘positive’ when tested. Several students will have a ‘positive’ result when tested. Students are then tasked with devising a method to determine the original source of infection. Additionally, students draw graphs to show exponential growth in infected individuals.
This is an excellent opportunity for students to learn about how disease is spread and gain an understanding of exponential growth. Students also gain practical experience in identifying the original carrier of a pathogen.
PREPARATION - BY LAB TECHNICIAN
General Notes
- The following procedure is written for a class of 30 students.
- Prepare only as many vials as you need, based on the number of students in your class.
- If the class size is less than 15 students, it is advised students only make two fluid exchanges.
General Preparations
- Collect one vial for each student and label each of them with a number in sequential order; for example 1-30.
- Select one vial to be the ‘infected’ vial. Note which vial you have selected and separate it from the others.
- To make 0.001M hydrochloric acid (HCl), add 1 mL of 0.1M HCl to 99 mL distilled water.
- Add 2 mL hydrochloric acid solution to the ‘non infected’ vials. Secure the lids on all the vials.
- Add 2 mL of sodium hydroxide to the ‘infected’ vial and secure the lid.
- Label four well plates: 0, 1, 2, and 3.
- Number one well per student on each of the 4 well plates. For each numbered vial there should be a corresponding well.
METHOD - STUDENT ACTIVITY
Spreading the Viral Infection
-
Collect 1 index card, 1 plastic pipette, and 1 screw-cap vial containing solution. The solution in the vial represents bodily fluid. Your vial will be labelled with a number.
- There are four well plates labelled 0, 1, 2, and 3. Locate your individual wells on the class well plates. These will be labelled with the number corresponding with the number on your vial.
- Using a plastic pipette, transfer 5 drops of the fluid from your vial into your well on Plate 0.
- Select a partner for your first exchange. Record their name and vial number on your index card.
- Using your plastic pipette, transfer 5 drops from your vial to your partner’s vial. Return any remaining liquid remaining in your pipette to your vial. Replace the vial cap and mix the solution by inverting it several times.
- Using a plastic pipette, transfer 5 drops of liquid from your vial into your corresponding well on Plate 1.
- Repeat steps 3-6 for the 2nd and 3rd exchanges and deposit your liquid into your wells on Plates 2 and 3, respectively. Select a different partner for each round and complete each step before proceeding to the next exchange.
- After all exchanges have been made, your teacher will add one drop of phenol red to your vial, which is an indicator solution that will determine if your vial has become ‘infected’. Vials that turn red or pink are positive for the pathogen (infection). Vials that turn yellow are negative, which indicates that your vial did not become infected.
- Report whether your vial tested positive. If so, share the names of the partners you exchanged fluids with.
- Based on your individual results and the data from your classmates, try and identify which vial the infection spread from. Your teacher will add a drop of phenol red to each of the wells in the well plates. You may be able to trace the spread of infection to the original source by observing which samples are positive in each round.
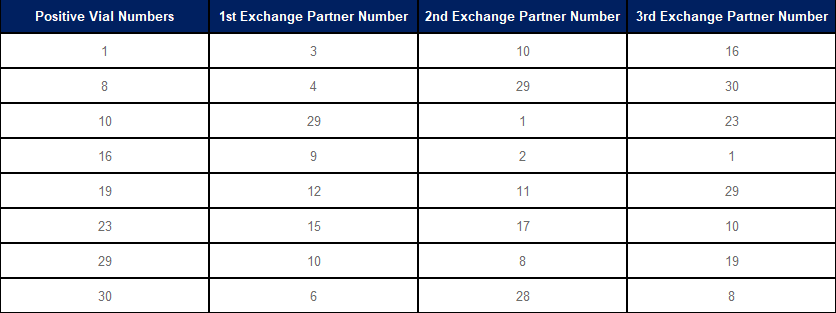
- Copy the results table into your logbook and complete the table to help you identify the source of infection. Once you have listed the positive vials and who they exchanged with, circle the numbers of the partners whose vials tested positive.
OBSERVATION AND RESULTS
Below is an example of possible results. Individual results will vary.

- Which vial was the original source of infection? After the 3 rounds of exchanges, how many vials tested positive?
- Calculate what percentage of your class this represents.
- Depending on the size of the class, the percentage will vary. Typically, 8 students will become infected out of a class of 30, representing 26.7%.
- Graph how many students were infected after each round.
INVESTIGATION
- If the class were divided into three groups of 10 at the start of this investigation and allowed to exchange only within their group, what would the transmission of the disease look like?
- Two groups would be unaffected, and the third would have up to eight infections after three exchanges.
- Did you know which vials were infected during the procedure?
- No
- Do you think an individual who does not show any signs of a disease is capable of transmitting the disease to others?
- Yes, as they may be asymptomatic.
- What is the importance of identifying patient zero in epidemics?
- Identifying patient zero during an epidemic is critical to determining how the outbreak began. Studying patient zero, helps epidemiologists and health experts understand the source of the disease, model its progress and prevent another outbreak from jumping from animals to humans.
- How does this simulation differ from the spread of disease in the real world; for example, the spread of COVID-19? Explain.
- Real-world infections are spread more sporadically than in the simulation, as real pathogens will not necessarily be transmitted in every interaction between individuals. Interaction rates are also slower and more erratic. Furthermore, real infectious diseases, such as COVID-19 typically require a longer incubation period in a host before the host can transmit the disease to another. In real epidemics, vaccines, hygiene practices and the body’s natural defences can aid in preventing the transmission of disease.
- List the appropriate measure that individuals should take to limit the spread of diseases.
- Student answers may include:
- Wash and dry your hands regularly and well
- Self-isolate if you are unwell
- Cover coughs and sneezes
- Clean surfaces regularly
- Immunise against infectious diseases
- Wear a mask when infected and isolation is not possible
- Being able to identify the original carrier is a critical skill for epidemiologists. When faced with epidemic viral infections, an epidemiologist will work backwards to identify the viral source. Ask students to consider how finding the “original carrier” in your class population compares to real cases of global epidemics.
- Discuss whether it would it be possible to identify who the “original carrier” was without the addition of Indicator Solution.
- Discuss the benefits of early testing and asymptomatic carriers and the effects they can have on disease spread
- Calculate the number of exchanges required to infect 1000 people
- Explore other possible applications for this practical. Discuss whether this procedure could be used to identify an infected person with a cold or hepatitis.
- Challenge students to consider why bed rest is such a common recommendation for people ill with a bad cold or the flu.
- Ask students to imagine the simulation involved the entire school population. Then, ask students to consider whether tracing back to the original carrier would be more or less difficult.
EXTENSION EXERCISES
-
Task students with researching different infectious diseases. Students’ research should include:
- Origins of the disease.
- How the disease is transmitted.
- Typical incubation period.
- Symptoms/ signs of the disease.
- Impact (i.e. death toll, cultural shifts, historical context).
- Possible vaccines and treatments.
- Preventative measures.
 Time Requirements
- 45 mins
 Material List
-
Per student:
- Simulation Epidemic Kit
- Plastic pipette
- Screw-cap vial containing a solution representing a body fluid
- Permanent marker
- Index card
- Disposable gloves
- Per class:
- Phenol red indicator
- 4 × 96-well plates labelled 0, 1, 2 or 3
 Safety Requirements
- Wear appropriate personal protective equipment (PPE). Disposable gloves can cause allergic reactions in sensitive people. Use a type of glove that has no allergy risk and is suitable to use with the chemicals in this investigation.
- Ensure that students know and follow all regulatory guidelines for the disposal of laboratory wastes.
- Thoroughly clean all culture tubes to remove traces of sodium hydroxide and Phenol Red, as these materials may interfere with future results if the experiment is repeated.
- Wash hands thoroughly before and after the experiment.
