Chemotaxis in Slime Mould

BACKGROUND
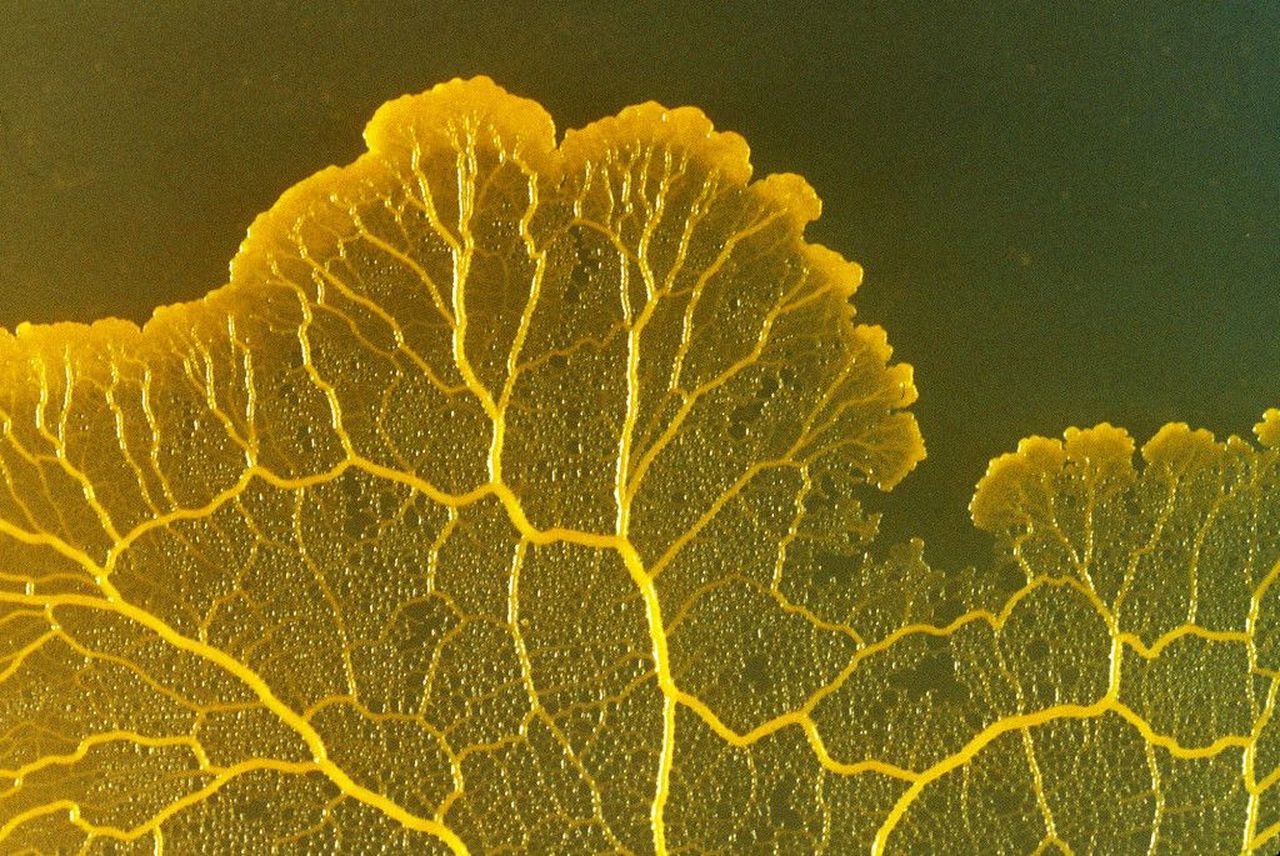
Physarum Polycephalum is a slime mould that can be found in a variety of cool, humid and dark environments; such as leaf litter. Classification of Physarum has been difficult as it possesses characteristics found across taxonomic categories; however, it can be said to belong to the Amoebozoa, the Mycetozoa, or the Myxomycetes. Physarum is a great model in the studies of cell differentiation, cytoplasmic streaming, cell cycle regulation, cytoskeletal rearrangement, mitosis, and meiosis. Many of the life processes of this mould mirror those of more complex organisms. The form of Physarum changes over its lifecycle as it adapts to different environments. Physarum is of great interest to developmental biology. The ability of Physarum to navigate among many complex strategies to find food, to form networks between different sources of food, and to modify those networks to maintain efficiencies, has drawn great interest among those who study networks and artificial intelligence. During its life cycle, Physarum takes different forms, each form suited to environmental circumstances. The form you will work with in this investigation is the plasmodial form. A Physarum plasmodium exists as a single large cell containing multiple diploid nuclei that replicate their DNA and divide synchronously. A single plasmodium may contain as many as 1010 nuclei. Under lab conditions, plasmodium has grown to more than 30cm in diameter.
In this investigation, students observe the ability of Physarum Polycephalum to respond to various substances through movement (Chemotaxis). Chemotaxis, describes when an organism or cell moves towards or away from increasing or decreasing concentrations of particular substances. In this procedure, students observe Chemotaxis in Physarum Polycephalum and determine the relative strength of Physarum’s attraction to five substances. Based on their existing knowledge, students predict whether Physarum will be attracted to or repelled by each substance. After conducting the experiment and observing the Physarum responses, students determine whether their initial predictions were correct and rank each substance according to Physarum’s attraction to them.
PREPARATION - BY LAB TECHNICIAN
Preparing Agar Plates- PrepTo melt 2% agar, loosen the agar bottle cap and place it into a beaker on a hot plate filled with boiling water. Prepare enough plates for each workstation. One bottle of agar should be sufficient for 5 plates.
- After 30 minutes, remove the agar and allow it to cool to approximately 55°C. As the agar is cooling, swirl it occasionally to ensure a smooth even consistency.
-
On a sterile workbench, pour the cooled agar into the sterile plates until the bottom of the plate is completely covered. Do not allow the agar to reach over 5mm deep. To reduce contamination risk, open the plates one at a time, only long enough to pour, and then replace the lids immediately.
- Wait 30 minutes for the plates to solidify before handling or moving them. If an excess of condensation occurs on the lids, you may leave the plates in place with the lids on for 24 hours to dry.
- Store agar plates in a ziploc bag at room temperature.
Preparing plates of Physarum
- Approximately one week before the procedure, prepare five plates of Physarum. To do this, cut a 0.5-cm square of Physarum-containing agar from the Physarum agar plate using a sterile scalpel.
- Lift the portion of Physarum-containing agar using your scalpel and position it Physarum side down on a fresh 2% agar plate in the centre.
- Using sterile forceps place roughly 25 oat flakes onto each plate. To encourage spreading out of the Physarum, the majority of the flakes should be positioned in the centre of the plate with roughly 6–7 flakes placed towards round the edge. To maintain the sterility of the remaining oat flakes, remove the flake from the packet quickly and immediately close the package.
- Store each plate separately in a ziploc bag at room temperature in a dark place. Wait 5 days before using the plates as you need time for growth to occur. However, do not allow the plates to grow for an extended period of time as the Physarum will begin to grow outside of the plate itself.
Preparing Workstations
- Provide each workstation with a small beaker filled with roughly 30% Ethanol or Isopropanol (≥70%). Then place all metal instruments for that workstation inside. The Alcohol only needs to be deep enough to submerge the ends of the metal instruments.
-
Provide each workstation with access to:
- 3 Agar plates (2%)
- 1 Vial of Sterile Paper Discs
- Sterile Scalpel
- Sterile Forceps
- 2 Plastic Pipettes (1 per substance)
- Ziploc Bag
- 1 Plate with Physarum plasmodium (Shared)
- 2 Substances from the following: 1 M Glucose, 1 M NaCl, 1 M KCl, 1 M CuCl2 and Cedar oil. You may like to randomly assign two substances to each workstation or allow students to choose their own. Ensure each workstation conducts a different test to generate the maximum data possible. Provide students with access to 1 drop of each.
METHOD - STUDENT ACTIVITY
Testing Physarum Attraction
- Label three plates with your group name along the edge at the bottom of the plate. Keep the label discreet to allow room for other labelling.
- Collect your test substances. Your teacher may assign you two substances to test or you may choose to test two substances not chosen by other class groups. You are required to triplicate this test on three seperate plates and contribute your data to the class.
- The tests will require you to place two sterile paper discs on opposite sides of the plate. You will need to indicate which substances are to be placed on each side. To do this, label the bottom of the plates to indicate the placement of each substance. To ensure the label can be easily read from the above when the plate is lid side up, look at the plate from the top (lid side) as you label the bottom. This will be useful when conducting later inspections on the disc. Do not label the lid.
-
Maintaining sterile technique, use sterile forceps to retrieve your paper discs. Remove all 6 discs at once and place them onto one of your plates. Close the disc vial immediately after disc removal to reduce exposure to potential contaminants. Likewise, immediately replace the lid on the plate containing the discs.
-
Transfer the discs onto each plate one at a time. Place two discs on opposite sides of the agar plate. Remember to only open the plates long enough to place the discs and replace the lid as quickly as possible.
-
Place one drop of each of the test substances onto the corresponding disc using a plastic pipette. Repeat this process for each plate. Use a fresh plastic pipette for each substance.
-
Cut a 0.5cm square of Physarum-containing agar from the provided Physarum agar plate using a sterile scalpel. Lift the portion of Physarum-containing agar using your scalpel and position it face down in the middle of the plate equal distance between the two discs.
-
Repeat step 7 for the remaining two plates.
-
Place the plates into a plastic ziploc bag lid side up. Seal the bag and store it in a cool, dark place.
-
Observe your plates at regular intervals over the next 24 hours if possible. If not, observe it 24 hours later. Inspect each plate to identify which substances the Physarum migrated to over the 24 hours period. Record this data along with any instances whereby the Physarum shows no clear preference. Draw a diagram of each plate, or alternatively, photograph your plates. Contribute your findings to the class data.
OBSERVATION AND RESULTS
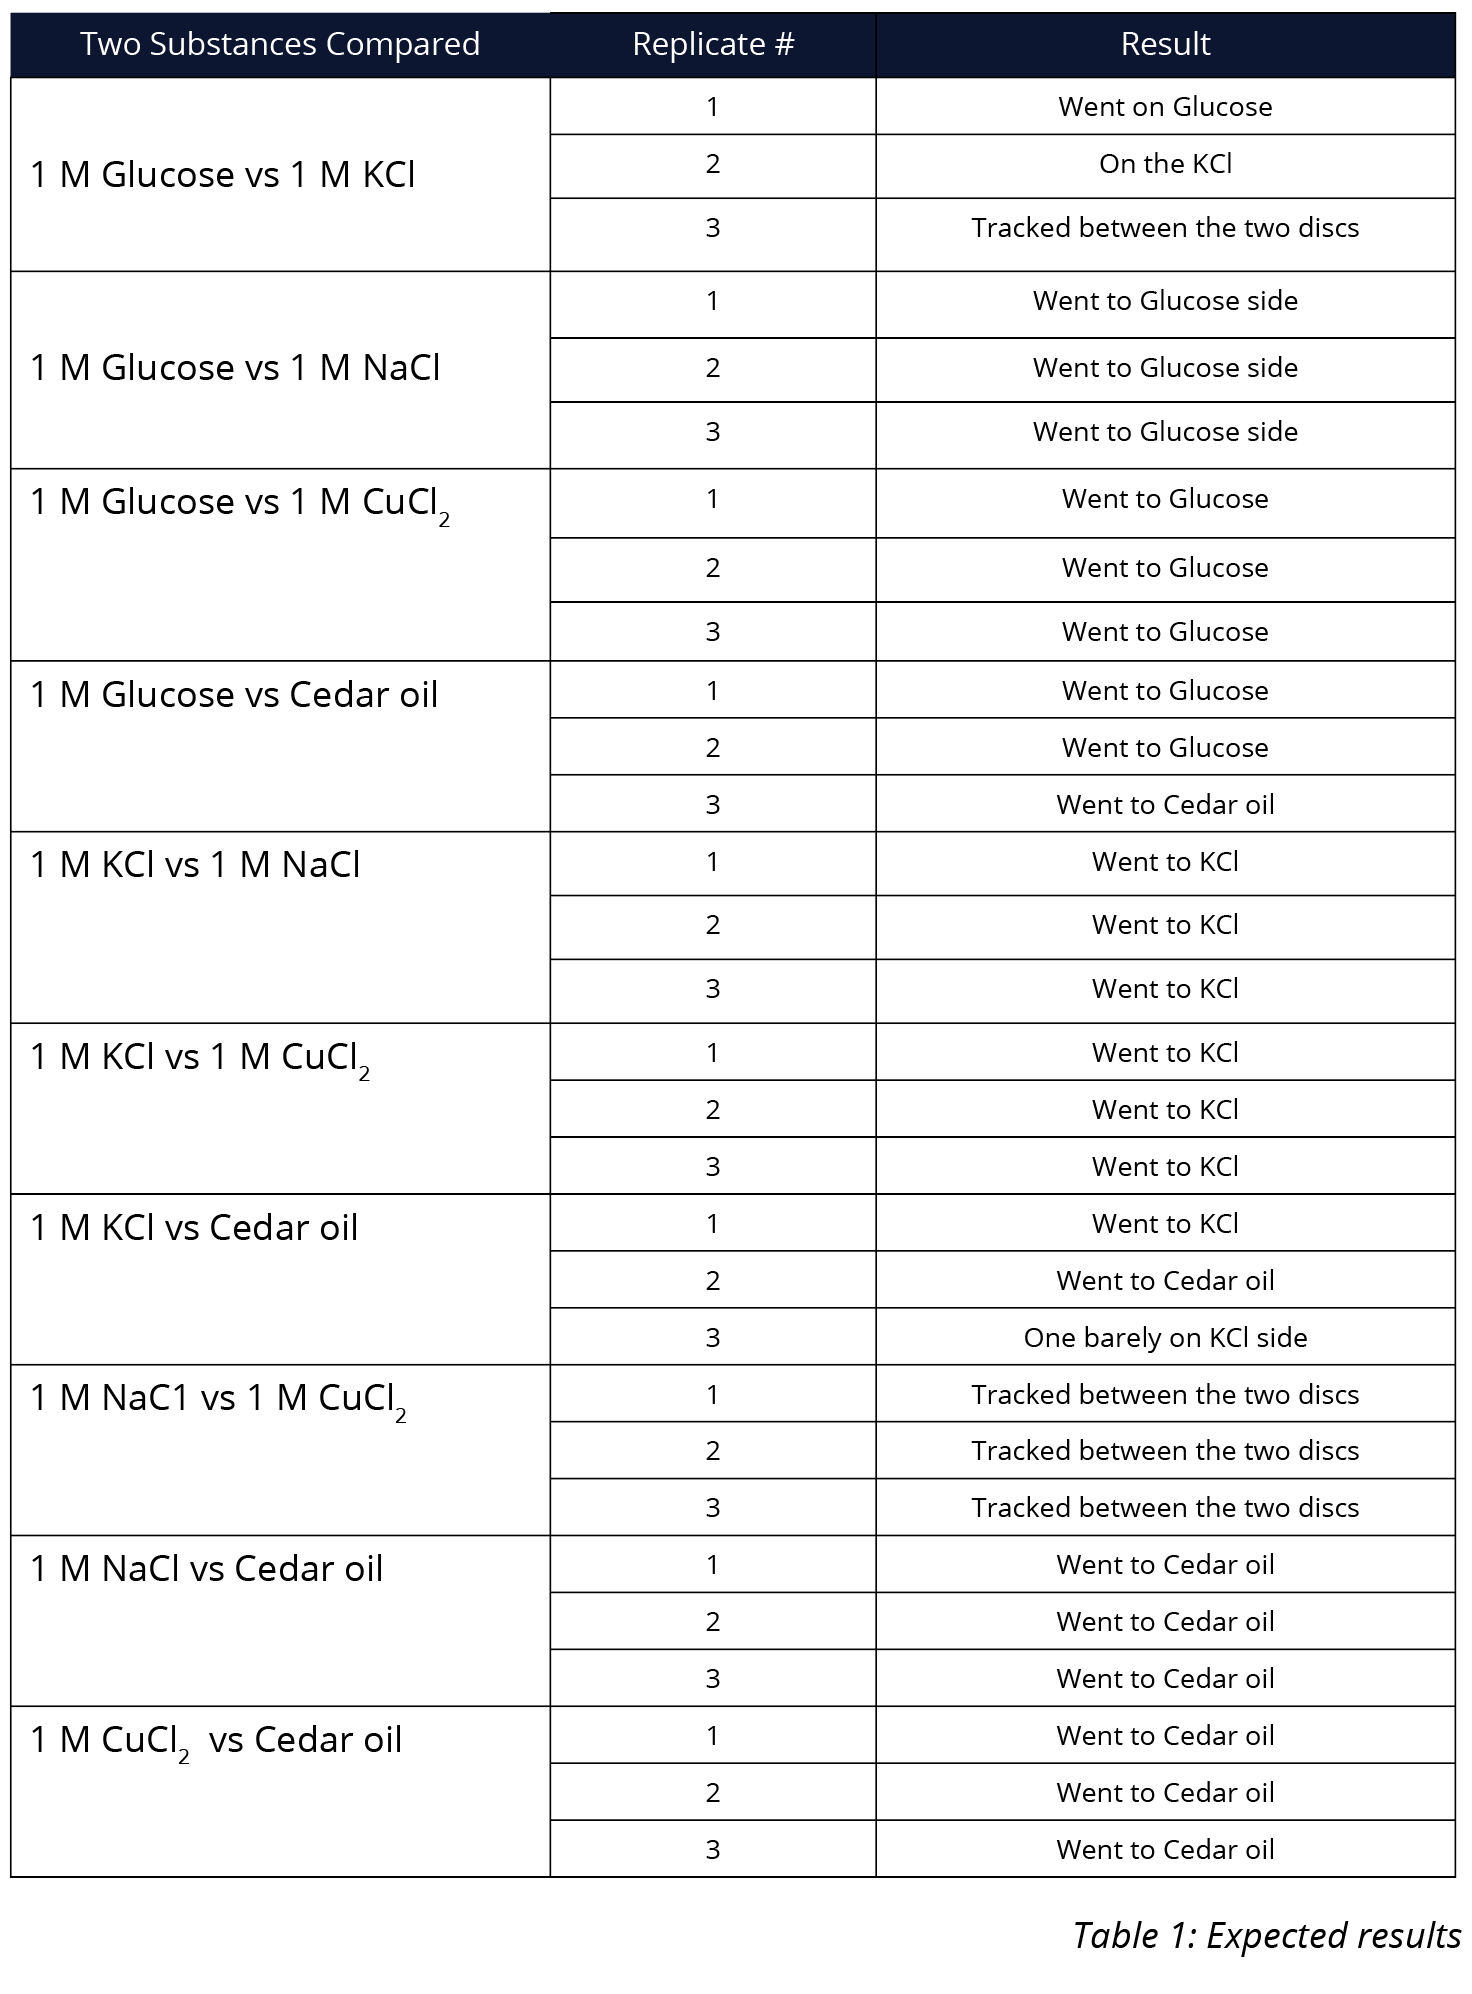
Below is an example of expected results. This is to be used as a guide only as individual results will vary.

INVESTIGATIONS
-
Ask students to describe the difference between positive and negative chemotaxis.
- Challenge students to suggest reasons why certain substances produce a negative chemotaxis response.
- Challenge students to suggest ways the experiment could be improved or enhanced to better represent chemotaxis.
EXTENSION EXERCISES
An excellent extension exercise for this investigation is to ask students to construct a maze to test a plasmodium’s ability to navigate through obstacles. Using a sheet of acetate, instruct students to design a maze that will fit on top of an agar plate. Once the maze has been constructed, it can be sterilised by soaking it in alcohol. Once soaked, instruct students to remove the maze from the alcohol and let it dry in sterile conditions. Ask students to place the maze on the agar and observe the Physarum’s behaviour. The Physarum will usually find the ‘right’ path. By coating the acetate with different substances students can further explore Chemotaxis and prevent the plasmodium from taking shortcuts.
 Time Requirements
- 50 mins
 Material List
- 3 Agar plates (2%)
- 1 Vial of Sterile Paper Discs
- Small beaker (Containing 70% Alcohol)
- Sterile Scalpel
- Sterile Forceps
- 2 Plastic Pipettes (1 per substance)
- 3 Ziploc Bags
- 1 Plate with Physarum plasmodium (Shared)
- Permanent Marker
- 1 M Glucose (1 drop) *
- 1 M NaCl (1 drop) *
- 1 M KCl (1 drop) *
- 1 M CuCl2 (1 drop) *
- Cedar oil (1 drop) *
- *Workstations/ students are allocated only two substances each
 Safety Requirements
-
Appropriate Personal Protective Equipment must be worn at all times.
- Wash your hands thoroughly, and clean all surfaces with 70% alcohol before and after the experiment.
- Handle scalpels with care to prevent serious injury. All sharps must be disposed of appropriately.
- Be aware Cedar oil can irritate skin and eyes. Do not allow it to come into direct contact with skin.
- While Physarum Polycephalum is not pathogenic, it is recommended that all microorganisms are treated as potentially hazardous.
