Osmosis and Diffusion

AUSTRALIAN CURRICULUM ALIGNMENT:
- Movement of materials across membranes occurs via diffusion, osmosis, active transport and/or endocytosis
BACKGROUND:
The cell membrane maintains the cell a separate entity; it holds the cell contents within, and acts as a barrier to the external environment. It is selectively permeable and has various mechanisms to allow for the exchange of gases and nutrients. These mechanisms allow for the intake of anything that is required and allows for the expulsion of waste and toxins. This membrane does not resemble a sheet or bag; rather, it is many molecules of Phospholipid Bilayers held together by the combined forces of attraction and repulsion. They are comprised of a Phosphate head; which is hydrophilic (water-loving), and a Lipid (fatty acid) tail which is hydrophobic (repelled by water). As the internal and external environments of a cell are aqueous, these molecules arrange themselves into two layers; one with the Phosphate heads oriented out into the external fluid, and the other with the heads oriented inwards into the internal fluid (the Cytoplasm). The Lipid tails are between the two layers of Phosphate heads; thereby, protected from the water, and the strength of this attraction/repulsion mechanism keeps the molecules together as though the membrane were a single entity.
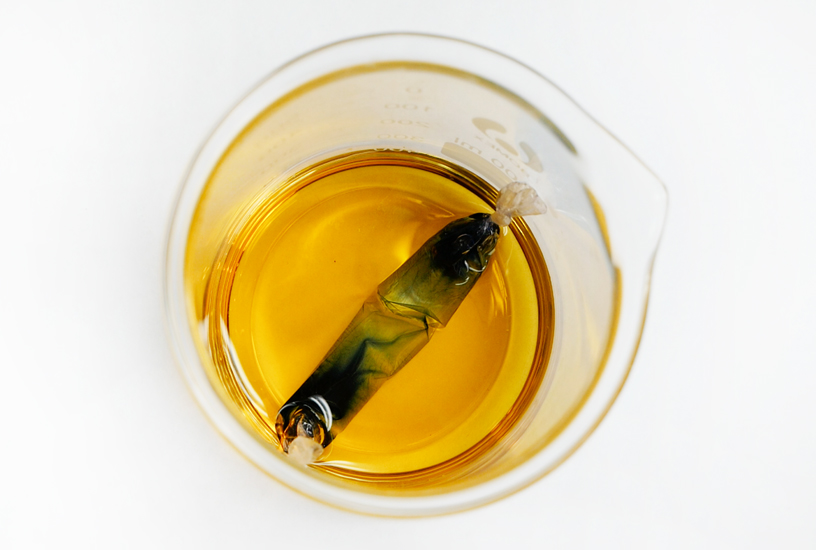
In this practical, dialysis tubing is used as a surrogate cell membrane for a visual demonstration of osmosis and diffusion. A solution containing large molecules (Starch) and small molecules (Glucose) is placed inside the tubing; which is then placed in a solution containing iodine. Students are able to observe as the solution inside the tubing turns dark blue, while the surrounding solution it is submerged in does not. From this, students can use their prior knowledge of the Starch-Iodine complex to surmise that Iodine is able to pass through the membrane while starch is not. The Glucose-testing strips indicate that glucose has been able to pass out of the tubing and into the external fluid. Thus proving the tubing allows movement in both directions.
This inexpensive and simple experiment provides students with a clear visual result that effectively demonstrates how the size of a molecule can affect its ability to be transported into or out of a cell. It also illustrates the mechanics of diffusion and osmosis by which a cell will attempt to create homeostasis, or equilibrium between its inner and outer environments.
PREPARATION - BY LAB TECHNICIAN
- Cut the dialysis tubing into 15cm lengths and soak for 15 minutes in a beaker filled with room temperature distilled water. Prepare one length of tubing per student or group. However, it is best to prepare extra strips for students, as some strips may tear or leak through handling.
- To create the Starch solution, dissolve 2g of Starch in 100mL of boiling hot water (2% solution) on a hot plate until the Starch powder has been fully dissolved. Stir as required.
- To create the Glucose solution, dissolve 30g of Glucose in 100mL water (30% solution) and continue stirring until the glucose has been fully dissolved.
- Combine the Starch and Glucose solutions in a single beaker. Use a stirring rod to mix well.
METHOD - STUDENT ACTIVITY
Glucose/ Starch Solution
- Measure 5-10 mL of the Glucose/Starch mixture in a small beaker or test tube.
- To determine the initial glucose concentration within the Starch/ Glucose solution, you will first need to dilute a sample of the mixture in water. To do this, collect 1mL of your mixture using a transfer pipette and add to a test tube filled with 9mL of water. Mix using a clean stirring rod.
- Measure the diluted Starch/Glucose by placing a Glucose-testing strip in the solution, immediately removing it and waiting 60 seconds to observe any colour change. Using the colour guide on the testing strip container, determine the approximate Glucose levels, and record the results.
Iodine Solution
- Fill a large beaker with 100mL water, and add 1mL of Iodine/KI solution. The solution should appear a yellowish colour.
- Measure the Glucose levels of the Iodine solution with another strip; following the same procedure as before. Ensure you record the results.
Preparing the "cell" tubing
- Retrieve your soaked piece of dialysis tubing and tie a knot in one end as though you are tying a balloon.
- Using a transfer pipette, half-fill the tubing with your undiluted Starch/Glucose solution and tie the other end to create a “cell”.
- Submerge the “cell” tubing into the Iodine solution.
Observing changes in the “cell”
- After 15 minutes, observe any colour changes in the tubing and in the beaker solution.
- Measure the Glucose levels in the Iodine solution.
- Carefully open the tubing and pour the contents into a clean beaker.
- To dilute the tubing contents for Glucose testing, collect 1mL of the contents using a pipette and deposit into a test tube filled with 9mL of water.
- Measure the Glucose levels in the diluted contents using a Glucose testing strip following the same procedure as before.
- Record the results of the Glucose testing.
- Compare the changes in Glucose levels before and after the 15 minute interval.
OBSERVATION AND RESULTS
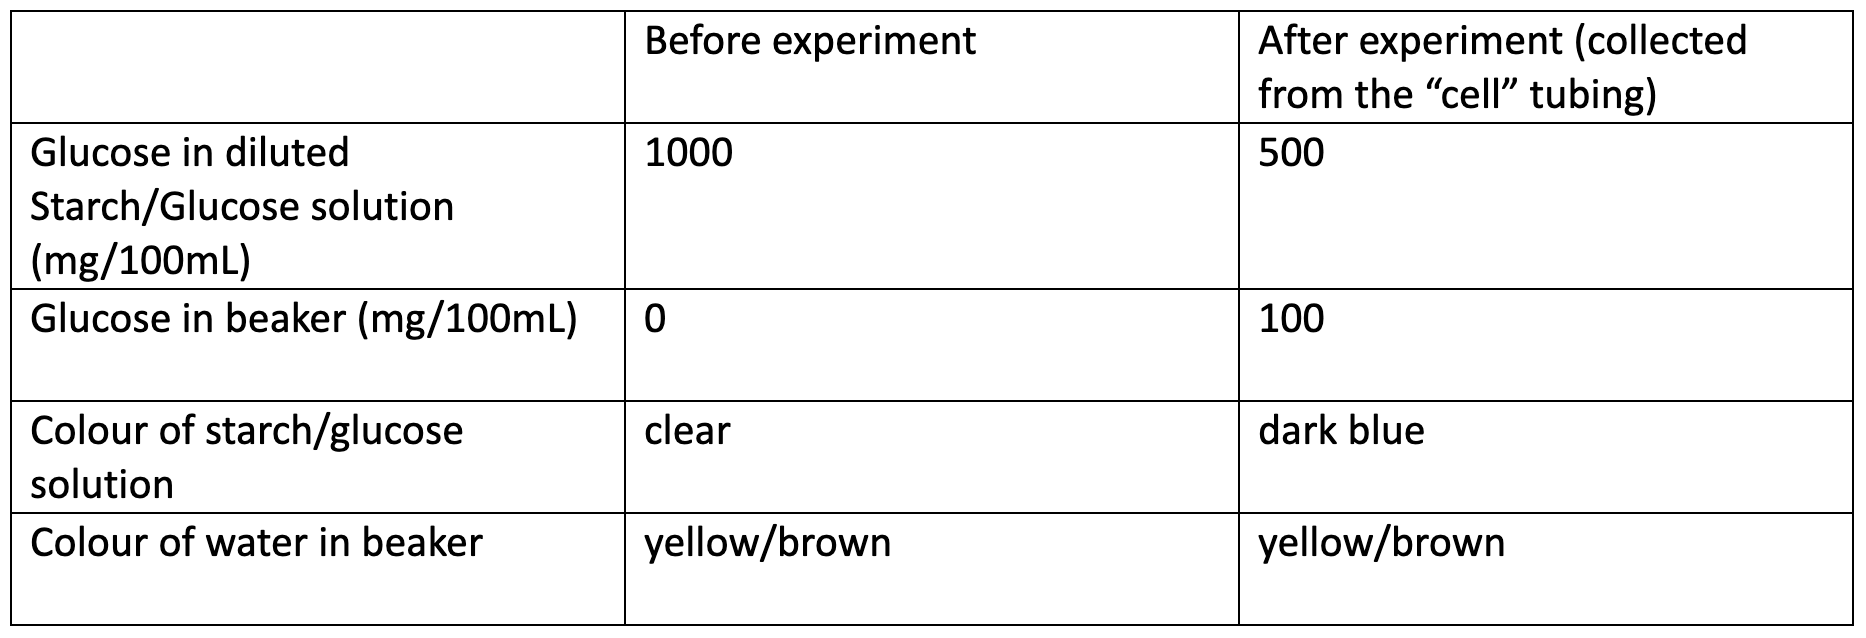
After fifteen minutes, the solution inside the tubing should begin to turn blue while the surrounding liquid remains yellow/brown. Starch molecules are too large to pass through the membrane; however, the Iodine molecules are small enough. This results in a Starch-Iodine complex that is confined to where the Starch is trapped - ie, inside the “cell”. Conversely, the Glucose molecules are free to pass through the membrane, and thus will begin to diffuse out in an attempt to equilibrate the Glucose concentration of the two solutions. Below is an example of possible results for the experiment.
INVESTIGATION
- Provide students with the information that you prepared a 100mL solution of 2% starch and a 100mL solution of 30% Glucose. Based on this information, ask your students to calculate the concentration of each in the combined solution. Students should understand that double the volume without extra solute means half the concentration, so what was 2g of Starch in 100mL (2%) is now 2g of Starch in 200mL (1%); and what was 30g of Glucose in 100mL (30%) is now 30g of Starch in 200mL (15%).
- Ask students to identify what occurred the Starch, based on the fact that the blue colour is found inside the cell but not outside of it, students should be able to identify that the Starch has not been able to pass through the tubing, while the Iodine has. Students should understand that the Starch-Iodine complex has therefore been confined to the area where both Starch and Iodine are found, that is, the inside of the cell.
- Ask students to describe what is suggested by the Glucose results. The appearance of Glucose into the previously Glucose-free solution in the beaker should inform students that Glucose has been able to pass through the membrane.
- To provide students with a deeper understanding surrounding the molecular size of Glucose and Iodine, you may provide students with the information that our dialysis tubing typically allows passage to molecules of up to 12,000 to 14,000 daltons (g/mol). This should provide some guidance of the sizes that Starch molecules can reach. Remind students, however, that the shape of a molecule may affect the passage as a large linear molecule may be able to pass through more easily than a smaller but globular molecule.
TEACHER NOTES
The concentration of Glucose in this practical is quite high to enable shorter waiting times for students. This allows them to more readily measure the glucose which has diffused out of the “cell” using their test strips. However, this also means that the initial concentration is too high to show that the concentration inside the cell has decreased in line with the increase outside the cell. To manage this, students are asked to take a sample of the original combined Glucose/ Starch solution prior to being placed in the “cell” and also a sample of the now-blue solution inside the “cell” at the end of the prac. Both solutions are diluted by a factor of ten to bring the Glucose concentration into the range of the Uriscan strips.
EXTENSION EXERCISE
To observe the process of cell diffusion and osmosis over an extended period of time, make an extra “cell” and keep it in solution until the next class. By the beginning of next class, the Glucose inside and outside the cell should have somewhat equalised. This could be conducted as a class demonstration, or each student may make an extra cell. Once again, dilute both solutions by a factor of ten prior to measuring.
TEACHER TIPS:
-
Prepare extra dialysis strips for students, as some strips may tear or leak through handling as students attempt to tie them.
 Time Requirements
- 45 mins
 Material List
- Starch
- Iodine/KI solution
- Glucose
- Glucose-testing strips
- Test tubes
- Test tube rack
- Beakers 500mL
- Beakers 100mL
- Transfer pipettes
- Water
- Stirring rod
 Safety Requirements
- Wear appropriate personal protective equipment (PPE); particularly gloves and a lab coat as Iodine will stain clothing and skin on contact.
- Exercise caution when handling the chemicals used in this prac.
- Avoid any direct contact with the solution and wash hands thoroughly.
