DNA Damage - The Impact of UV Light

AUSTRALIAN CURRICULUM ALIGNMENT:
- Variations in the genotype of offspring arise as a result of the processes of meiosis and fertilisation, as well as a result of mutations (ACSBL084)
- Mutations in genes and chromosomes can result from errors in DNA replication or cell division, or from damage by physical or chemical factors in the environment (ACSBL082)
- Mutation is the ultimate source of genetic variation as it introduces new alleles into a population (ACSBL092)
BACKGROUND:
We classify the broad spectrum of electromagnetic radiation from the sun into segments according to the effects we experience. For example, the warm sensation of sunshine on our skin is caused by invisible infrared radiation with wavelengths ranging from 700nm to 1,000,000nm (1mm). Visible light is comprised of wavelengths between 400nm (violet) and 700nm (red). Radiation with wavelengths shorter than 400nm but longer than 10nm is classified as Ultraviolet (UV) radiation. Radiation with wavelengths shorter than 10nm are classified as X-Rays. Some exposure to UV radiation is necessary for humans to produce vitamin D, but a careful balance is required because X-Rays and UV radiation are destructive to many biological molecules, including DNA. Fortunately, the earth’s atmosphere acts as a protective screen and filters out almost all the sun’s radiation with wavelengths shorter than 290nm. Nevertheless, the narrow UV band from 290nm to 400nm that can penetrate the atmosphere and reach the surface of the earth is capable of causing photochemical damage to DNA that can lead to skin cancer, so it is important to avoid over-exposure. As a defence against too much UV exposure, most organisms that are subject to the sun’s rays have evolved to incorporate some level of DNA repair in their cell mechanisms. This confers a limited amount of inherent UV resistance.
In this practical, students will expose the mutant strain of yeast, Saccharomyces cerevisiae, to UV. This strain does not incorporate all the genes necessary for effective repair of photochemically damaged DNA. As a result the exposure to sunlight kills this strain of yeast more quickly than wild type Saccharomyces cerevisiae. This is an excellent opportunity for students to observe how UV radiation can be destructive for many biological molecules.
PREPARATION- LAB TECHNICIAN
-
Prepare one starter plate of each strain of yeast for each student workstation at least 48 hours before planned use. In order to ensure you are working with vigorous yeast cells in the exponential growth phase, it is necessary to prepare a starter plate. The timing will depend on the incubation temperature you plan to use. Prepare 48 hours before exposure if incubating at 30°C, or 4 days before exposure if incubating at room temperature (24±4°C). Work out a temperature/time regime that suits your equipment and schedule. To be able to do the student experiment on a Wednesday; you should prepare your starter plate on the Monday and incubate at 30°C for 48 hours. If you will be doing the student experiment on a Monday, you should prepare your starter plate on the previous Thursday and incubate for 4 days at room temperature. The main thing is to keep the starter plate in darkness and use it at the appointed time. If you extend the incubation time (longer than 48 hours at 30°C or longer than 4 days at room temperature), the exponential growth phase will have passed and the cells will not be ideal for the student experiment.
- Use a sterile inoculation loop to collect a UV-sensitive yeast sample from the slope.
- Aseptically transfer the UV-sensitive yeast sample to a fresh YED plate.
- Repeat this process to create a ‘control’ plate using Saccharomyces cerevisiae. One starter plate of each yeast strain will be enough to supply yeast samples for several student groups, but it is prudent to make a number of starter plates in case one or more fail to grow, and to enable students to work simultaneously without having to wait for a group to finish and pass the starter plate on.
METHOD-STUDENT ACTIVITY
Part A: Inoculation of Exposure PlatesNote: To use aseptic technique, wipe your bench down with Ethanol (or bleach) and keep your work near the Bunsen burner to waft potential contaminants away from your materials.
- Collect two YED agar plates and label one UV (UV-sensitive) and the other WT (wild-type), along with the exposure time you intend to test (5, 10, 15 or 20 minutes). As a class, you can test all four exposure times, pool your data and compare your results. Alternatively, you may like to test all four exposure times yourself; in this case you will need eight YED agar plates and eight sterile swabs.
- Using a plastic pipette, place 1 mL of sterile water into a sterile culture tube.
- Using a sterile inoculation loop, carefully scrape a single colony of the UV-sensitive yeast from the starter plate.
- Select a large colony (>4mm in diameter), or if the colonies are small, scrape up two (or even three) onto the loop.
- Place the loop in the water in the sterile tube and spin/swirl it to transfer the yeast into the water.
- Visually check that the cell mass has transferred from the loop to the water.
- Using a plastic pipette, immediately pump the liquid to distribute and suspend the yeast cells in the water. Avoid introducing air bubbles or splashing the liquid up the sides of the tube. When finished, hold the tube up to the light to check that there are no visible lumps or particles in the water.
- Dip a sterile swab into the yeast suspension and as you withdraw it, press it against the sides of the tube to squeeze out excess water. It should come out moist but not dripping.
- Using aseptic technique, ‘swab’ the surface of a YED plate in three directions to inoculate for a lawn culture.
- Immediately cover the plate to shield it from light and allow it to rest (right way up) for a period of at least 15 minutes and up to 1 hour. This allows the moisture from the swab to be absorbed by the agar.
- If testing all four exposure times, repeat steps 8–10 for the remaining three UV-sensitive yeast plates.
- Using the wild-type yeast, repeat steps 2–10.
Part B: Exposure to Sunlight
Note: It may be prudent to perform some tests a few days before the planned student activity to gauge the required time of exposure. Without having some idea of how long to expose the plates, the risk is that you will either under-expose the plates (too little exposure – no degradation) or overexpose the plates (too much exposure – total degradation of all samples, including controls).-
State your hypothesis.
-
After the post-inoculation resting period, expose the one inoculated plate from each strain to direct sunlight for your chosen exposure time. - Immediately after exposure, cover the plates and incubate them in darkness for 48 hours at 30°C or 4 days at room temperature.
- For best results, follow these guidelines:
- Keep the plate shielded from light until the last moment.
- Use adhesive tape to attach the lid of the petri dish to the base, but do not allow the tape to extend on to the surface of the lid where it will absorb UV light and shield the yeast from exposure. Write identifying notes on the base of the plate.
- Orient the plate so the lid is pointing directly at the sun. Aim to minimise the size of the shadow. If the sun’s rays strike the lid at a glancing angle, most of the UV light will be reflected and the effectiveness of the exposure will be reduced.
- Schedule the experiment at a time of year when you can be sure of bright sunny conditions. Late Spring or Summer or early Autumn are best.
OBSERVATION AND RESULTS
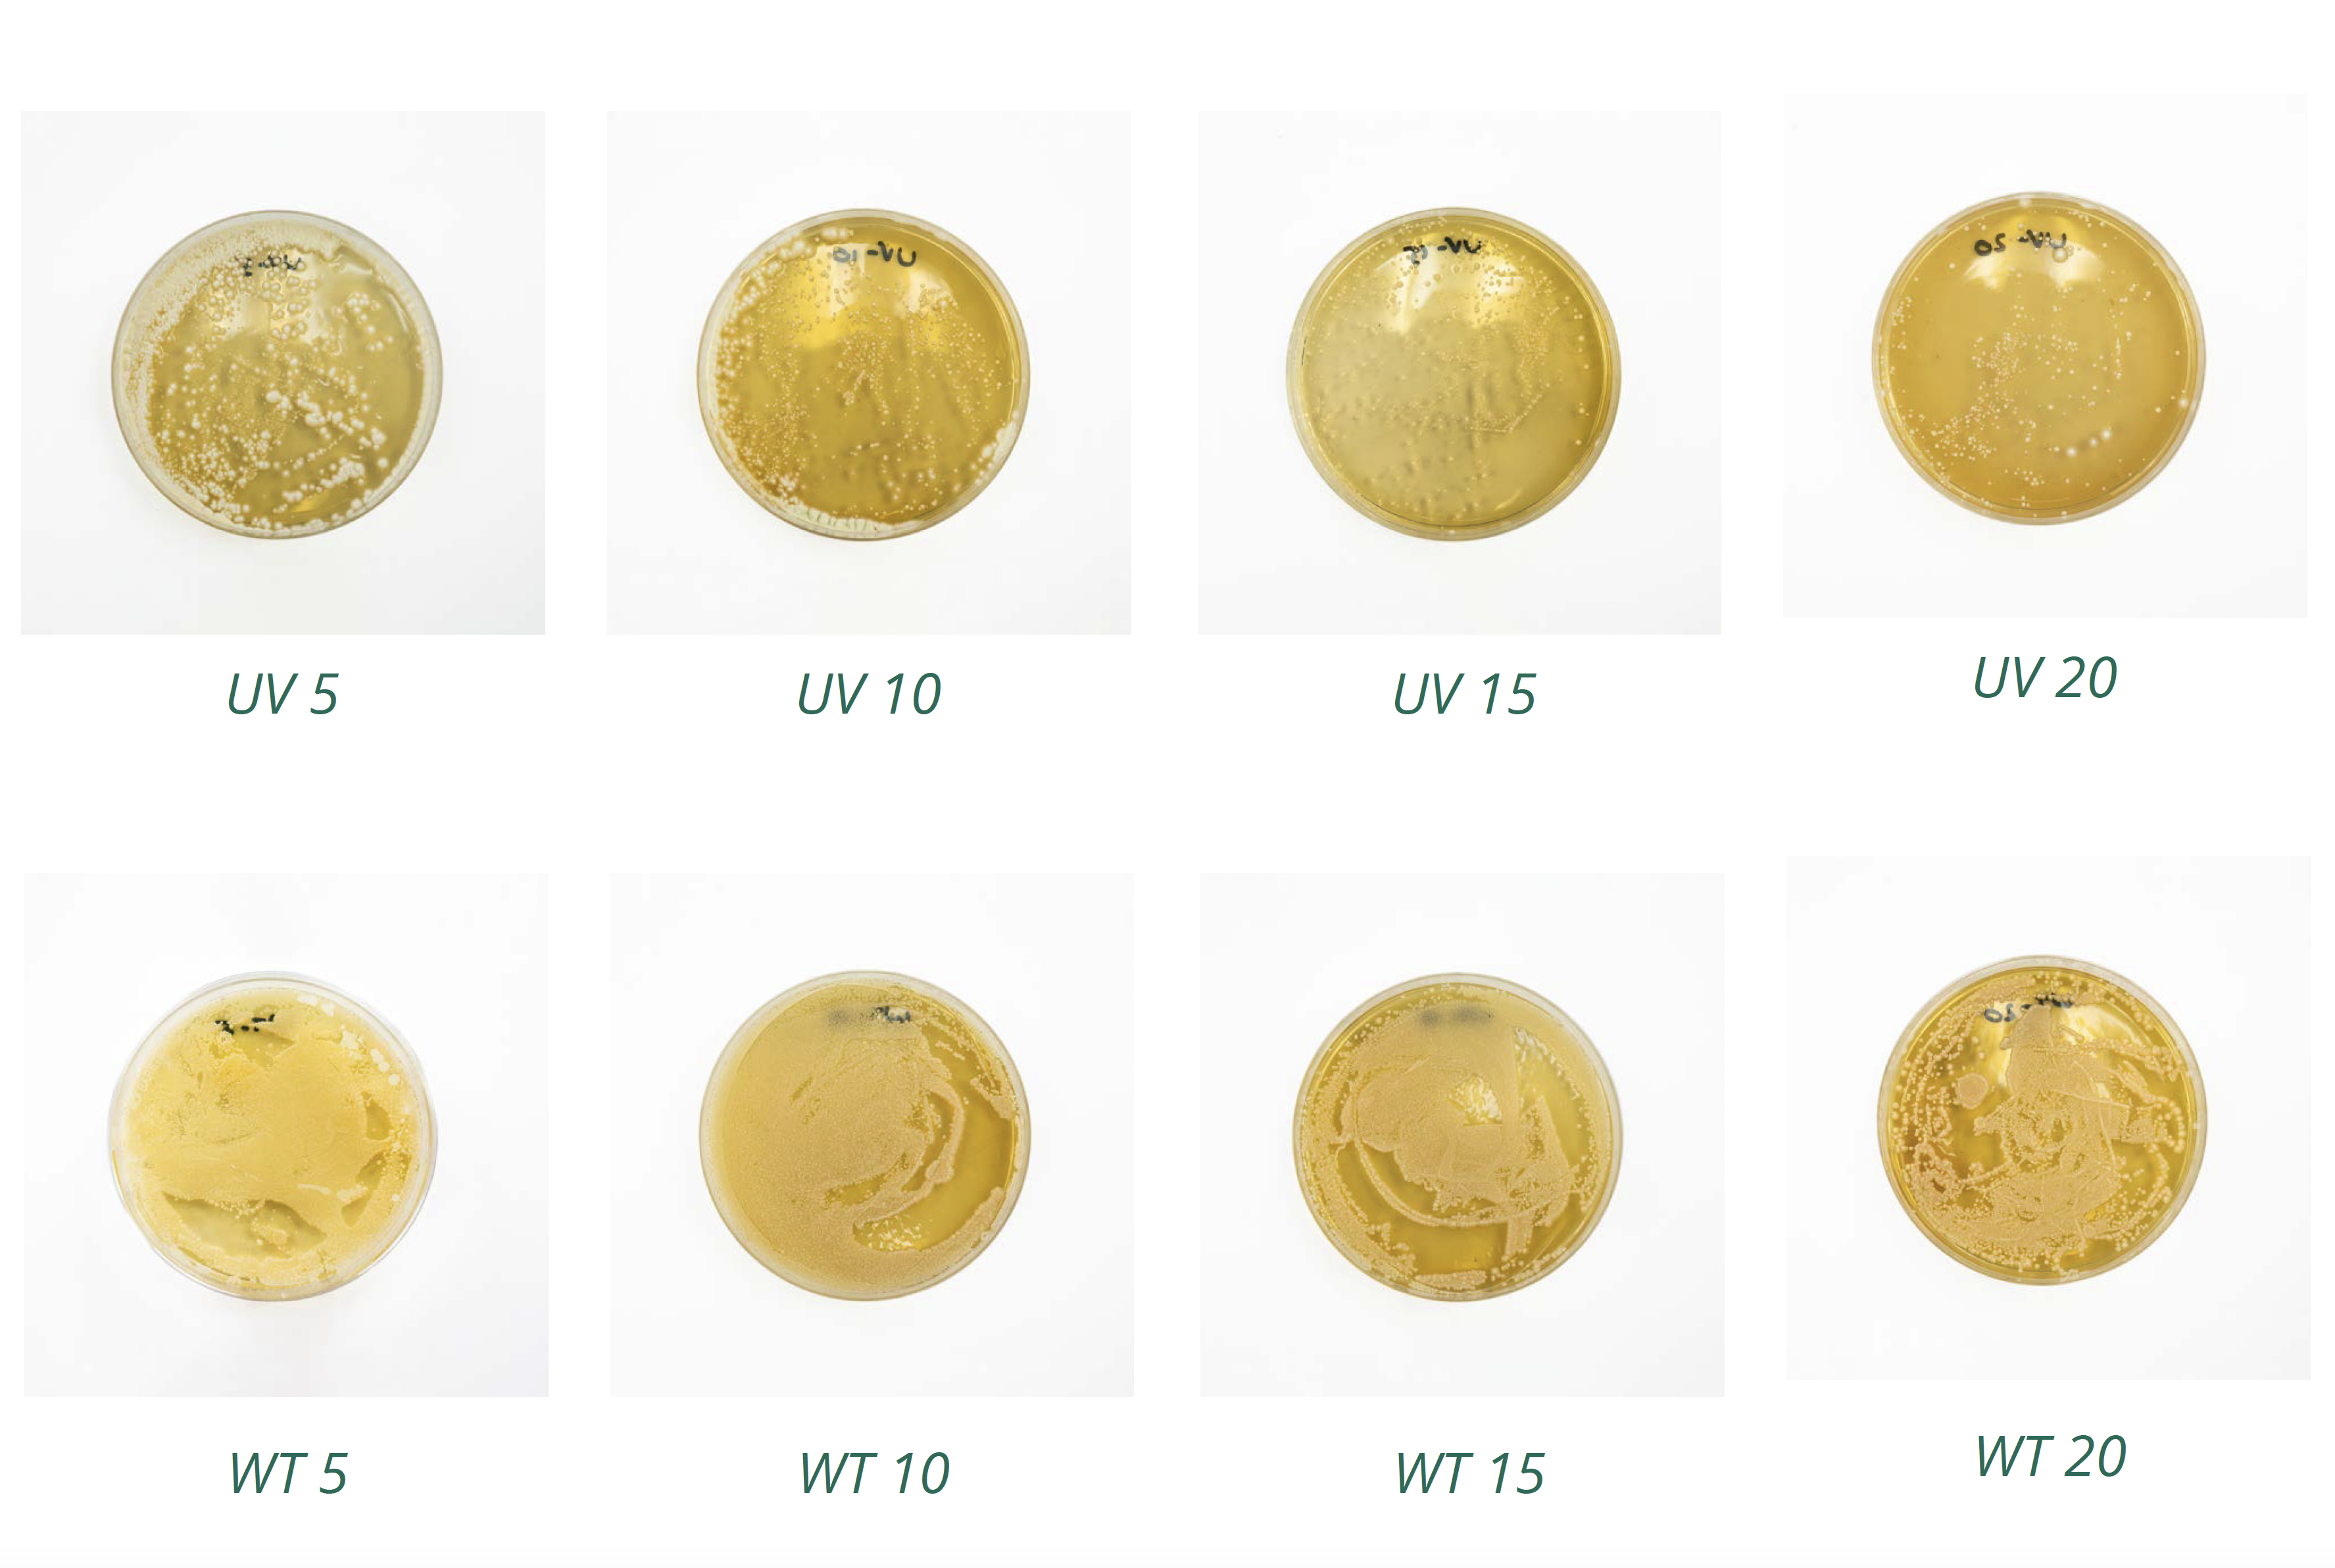
After the incubation period, get students to compare the level of coverage between the plates to observe the degrading effect of UV light on different strains of yeast. Individual results will vary, however you should see greater UV damage to the UV-sensitive yeast and less coverage on these plates in comparison to the wild-type yeast plates. Compare the results of your UV-sensitive yeast sample with the wild-type yeast sample. What differences do you observe? What conclusions can you draw from this data?

INVESTIGATION
- What is your hypothesis?
- What is your independent variable?
- What is the range of your independent variable?
- What is your dependent variable?
- What are your control variables and how did you control them?
- Were there any extraneous variables that you needed to consider?
- Compare your results with others in your class? Were the results consistent?
- Did your experiment support or refute your hypothesis or were your results inconclusive?
EXTENSION ACTIVITIES
- Graph your results in your logbook.
- Write a conclusion of no more than 60 words for this investigation.
- Effectiveness of Sun Blocks: To protect our skin from harmful UV rays we apply different sunscreens with different sun protection factor (SPF) values. Do these values have any merit? Are commercially produced sunscreens any better than alternatives such as coconut oil, clothing material and sunglass lenses? Design an investigation to find out.
- Obtaining Numerical Results: Prepare a suspension of UV-sensitive yeast cells by transferring a colony from a starter plate to 10mL of sterile water. Use a micropipette to produce five more vials in a serial dilution ranging from 10-1 to 10-5. Use a micropipette to transfer 150uL of each suspension to a YED plate (total of 6 plates) and spread with a sterile spreader (one per plate). Incubate in the dark and identify the dilution for which the plate has around 30 to 120 colonies. This is enough colonies to be easily counted without being too many to count. Repeat the procedure but this time produce 6 plates at the dilution level identified as having around 30 to 120 colonies. Carry out an evaluation to determine how long you need to expose the plates to kill all the cells by adapting the main protocol.
TEACHER TIP
UV sensitive yeast is degraded by exposure to UV light. Although indoor lighting and indirect sunlight contains very low, if any, UV radiation, we recommend ensuring minimal exposure by:- Drawing down blinds if working near windows
- Switching off unnecessary lights when working under interior lighting
- Covering the UV sensitive yeast culture with opaque foil whenever possible.
 Time Requirements
- 55 mins
 Material List
- DNA Damage: The Impact of UV Light 8 Station Kit
- UV-sensitive yeast, Live Slope starter plate
- Wild yeast, Live Slope starter plate
- 2 sterile swabs
- 2 YED agar plates
- Plastic pipettes
- 2 sterile culture tubes
- Bunsen burner
- Adhesive tape
- Permanent marker
- 2 sterile inoculation loops
- Ethanol or bleach
- Sterile water
 Safety Requirements
- Wear appropriate personal protective equipment (PPE). Disposable gloves may pose allergy risk. Use a type of glove that removes allergy risk and is suited to chemicals being used.
- Know and follow all regulatory guidelines for the disposal of laboratory wastes.
- Wash your hands thoroughly after the activity.
- Microorganisms will grow on the agar plates. Do not open plates once they are securely taped. Dispose of plates appropriately after autoclaving.
![]() Reference Kits
Reference Kits

