Circulatory System
Buy The Kit- Biology
- Classroom Practicals
- Physiology
- Year 11&12
AUSTRALIAN CURRICULUM ALIGNMENT
-
In animals, the transport of materials within the internal environment for exchange with cells is facilitated by the structure and function of the circulatory at cell and tissue levels (for example, the structure and function of capillaries) (ACSBL058)
BACKGROUND
Vertebrates, such as humans, possess a closed circulatory system. In this system design, blood cells and plasma are transported through a network of progressively smaller vessels where oxygen and nutrients are diffused into the interstitial fluid (fluid between cells). Cellular waste products are also diffused into the blood. Arteries are large vessels that deliver oxygenated blood from the heart to body tissues. This oxygen rich blood is transported to arterioles (smaller vessels) and then to the capillaries (dense beds of tiny vessels). The capillaries small size allows the diffusion of molecules (CO2 and O2) into and out of these tissues. After exchange, deoxygenated blood moves from the capillary beds into venules and then into larger veins. Blood is then directed back toward the heart and then toward an organ of gas exchange (i.e., lungs, gills or skin). During circulatory, waste products are also transported to other organs that will eliminate them from the organism. Conversely many invertebrates, such as arthropods and molluscs, possess open circulatory systems. Open circulatory systems are a tube or sac-like heart that pumps a blood-like fluid to different regions of the organism.
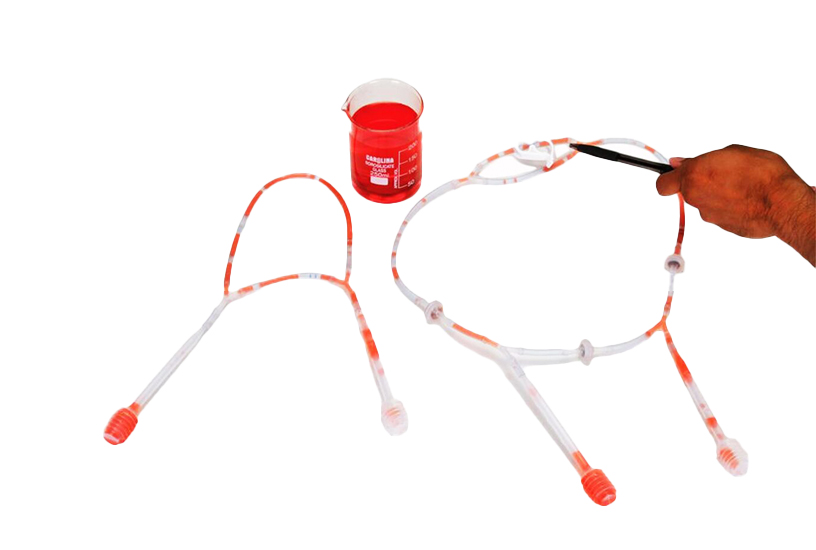
In this investigation, students will explore how blood flows through the heart by creating three two-Chambered heart models using bellows pipettes and tubing. Using a tubing clamp, students will model a blockage in the pulmonary vessel. This is an excellent way to visualise what occurs within the heart during a heart attack.
LAB PREP - BY LAB TECHNICIAN
Preparing Tubing
-
You will receive 32 tubes in the kit. These tubes require cutting down to size. Each student workstation will require three long tubes (approx. 15cm) and 6 short tubes (approx. 7.5cm). To achieve this, collect two of the provided tubes and cut one into three equal lengths. Cut the other tube into six equal lengths. Repeat this step for each student workstation.
Preparing Workstations
- Provide each workstation with the following materials:
- 1 Tubing Clamp
- 3 Long Tubes (15 cm)
- 6 Short Tubes (7.5 cm)
- 4 Y Connectors
- Parafilm® squares
- 2 One-Way Check Valves
- 2 Bellows Pipettes, 7 mL
- Red Food Dye Solution
- Paper Towels or newspaper
METHOD - STUDENT ACTIVITY
- Lay down some paper towels or newspaper over your work surface to prevent red food dye solution from staining.
- Collect a bellow pipette and insert it into one end of a long tube. Continue to push and twist the pipette in until it is securely embedded in the tube.
- Squeeze the pipette to depress it and place the open end of the connected tube into the bottle of red food dye solution.
- Raise the open end of the tubing to draw the liquid further into the pipette to make room for more.
- Repeat this procedure once or twice more to fill the tubing further. Be careful when depressing the pipette bellows once there is liquid inside the setup to avoid squeezing too much out again. Do not fill completely as any bubbles in the liquid will help with visualisation.
- To fill the 2nd pipette, depress the bellows, put the tip into the coloured water and release the bellows.
- Carefully insert the 2nd pipette tip into the open end of the tubing to connect the 2.
-
Add parafilm to the tubing and pipette connections to decrease the risk of liquid spilling out.
- Depress one bellows pipette and observe the flow of liquid. Depress the opposite pipette to watch the liquid flow in the opposite direction.
- Photograph the model and record video of the movement of the blood.
- Empty the liquid by removing the 2nd pipette and positioning the open tube end over the bottle. Use the 1st pipette to pump the liquid out, then carefully disassemble.
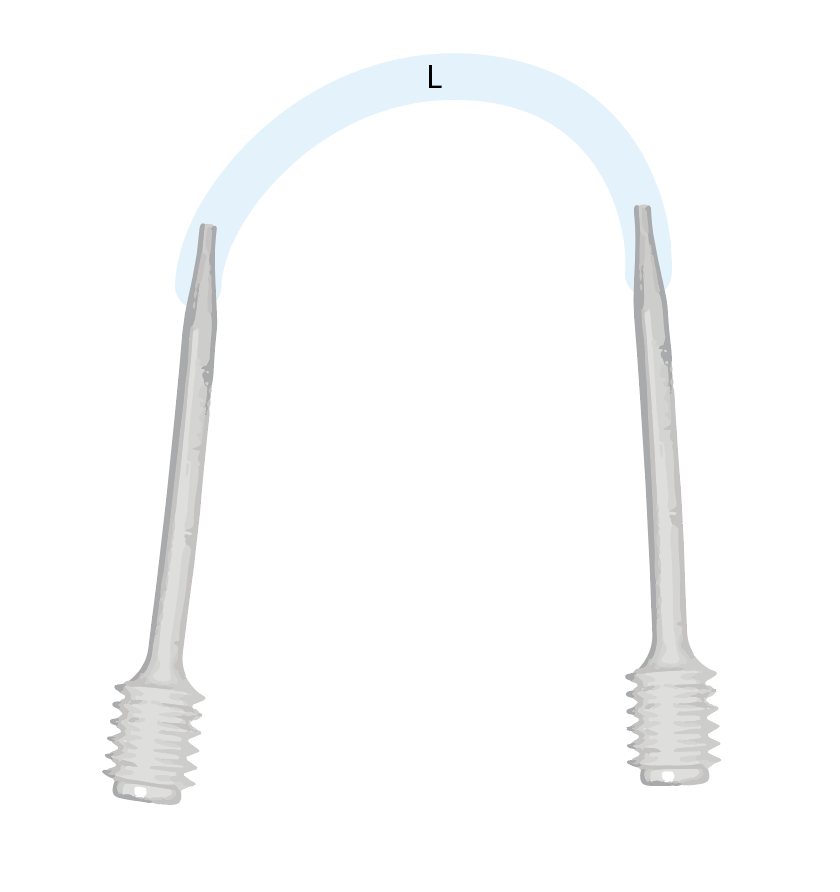
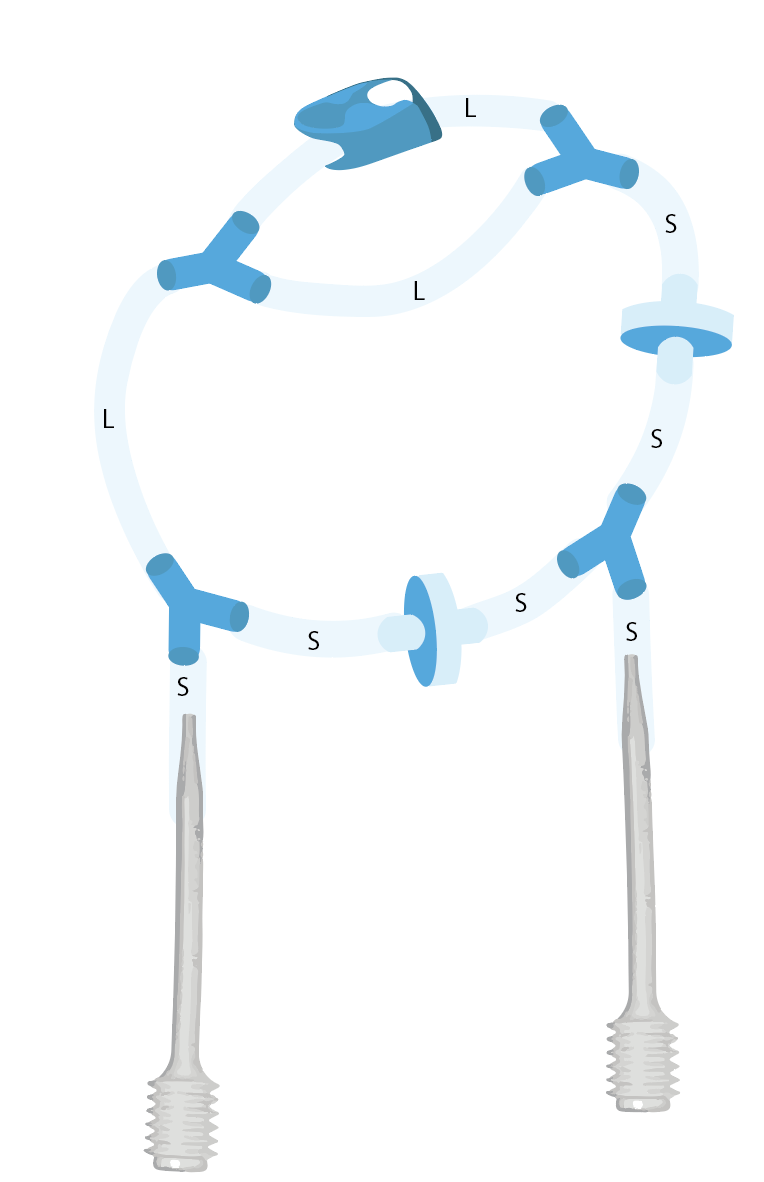
- Insert a bellow pipette into one end of a short tube.
- Insert a Y-connector into the open end of the connected tube.
- Connect a long tube to one end of the Y-connector.
- Connect a short tube to the other end of the Y-connector.
- Insert a one-way check valve into the short tube that is attached to the Y-connector. Then connect a short tube to the other end of the one-way check valve.
- Insert a one-way check valve into the long tube.
- Connect a short tube then insert a Y-connector. Use this Y-connector to connect to the short tubes to form a loop.
- Connect a short tube to the remaining open end of the Y-connector.
- Squeeze the pipette to depress it and insert the open end of the tube into the bottle of red food dye solution. Fill the circulatory model using the same method as before.
- To fill the 2nd pipette, depress the bellows, place the tip into the coloured water and release the bellows. Then, insert the pipette into the open end of the circulatory system model.
- Depress 1 bellows pipette and observe the flow of liquid. Depress the opposite pipette to watch the liquid flow in the opposite direction. Use parafilm if necessary.
- Photograph the model and record video of the movement of the blood.
- Detach one of the pipettes and squeeze out the liquid. Position the open tube end over the bottle and use the attached pipette to pump the liquid out. Do not disassemble the model.
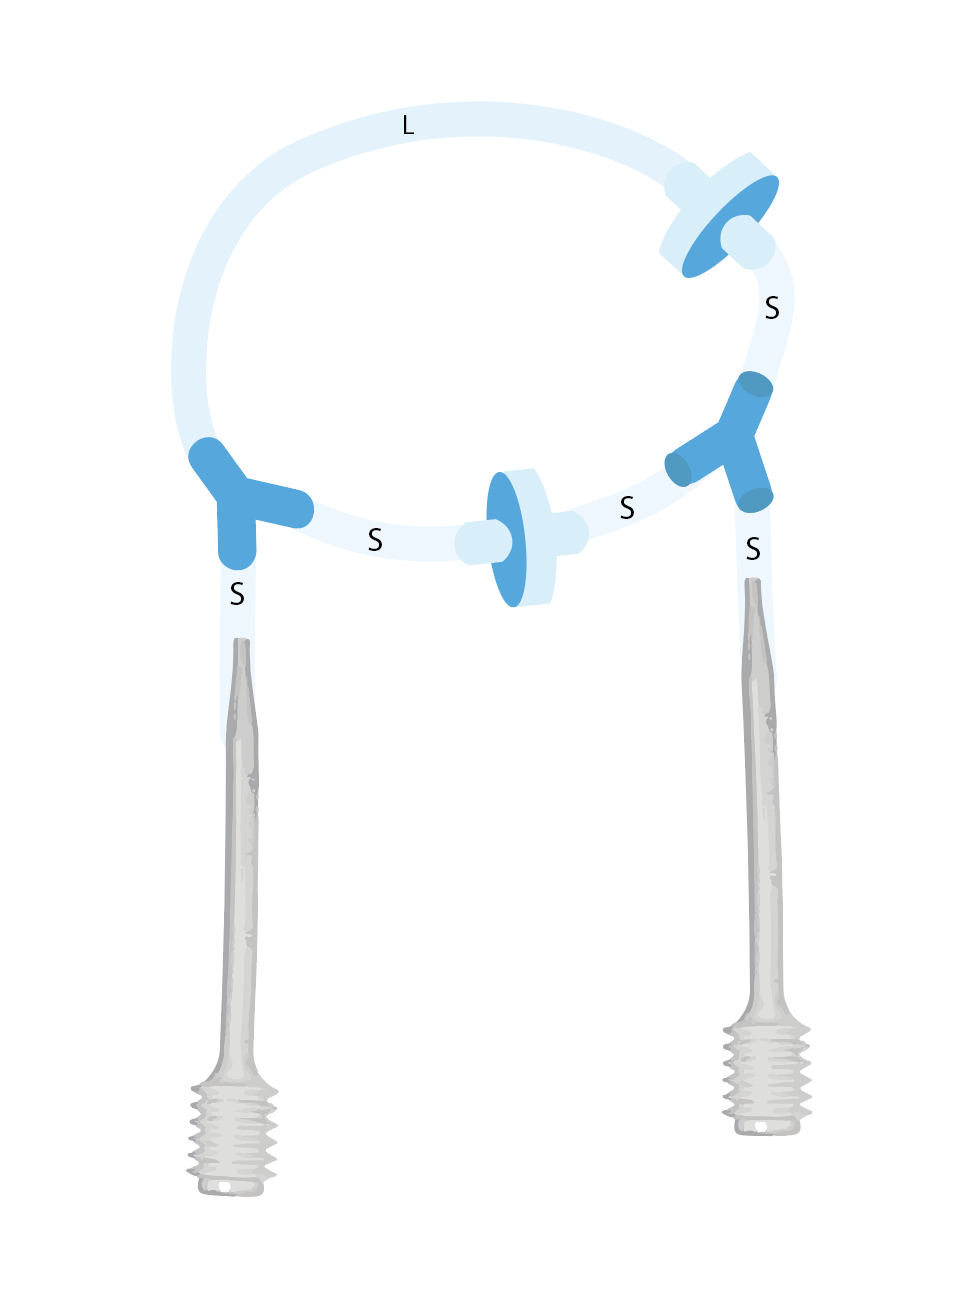
Model 3: 2-chambered heart with 2 valves and 1 branched pulmonary vessel with blockage
- Collect the 2nd circulatory system model you prepared and disconnect the long tube from the one-way check valve and insert a Y-connector.
- Connect 2 long tubes to the Y-connector.
- Secure a tubing clamp to one of the long tubes.
- Connect the 2 long tubes to the forks of a Y-connector. Then connect to a short tube.
- Connect to the one-way check valve to form a loop.
- Squeeze the pipette to depress it and insert the open end of the tube into the bottle of red food dye solution. Fill the circulatory model using the same method as before.
- To fill the 2nd pipette, depress the bellows, put the tip into the coloured water and release the bellows. Then insert the pipette into the open end of the circulatory system model.
- Depress 1 bellows pipette and observe the flow of liquid. Depress the opposite pipette to watch the liquid flow in the opposite direction. Use parafilm if necessary.
- Photograph the model and record video of the movement of the blood.
- Detach one of the pipettes and squeeze out the liquid. Position the open tube end over the bottle and use the attached pipette to pump the liquid out, then carefully disassemble.
OBSERVATION AND RESULTS
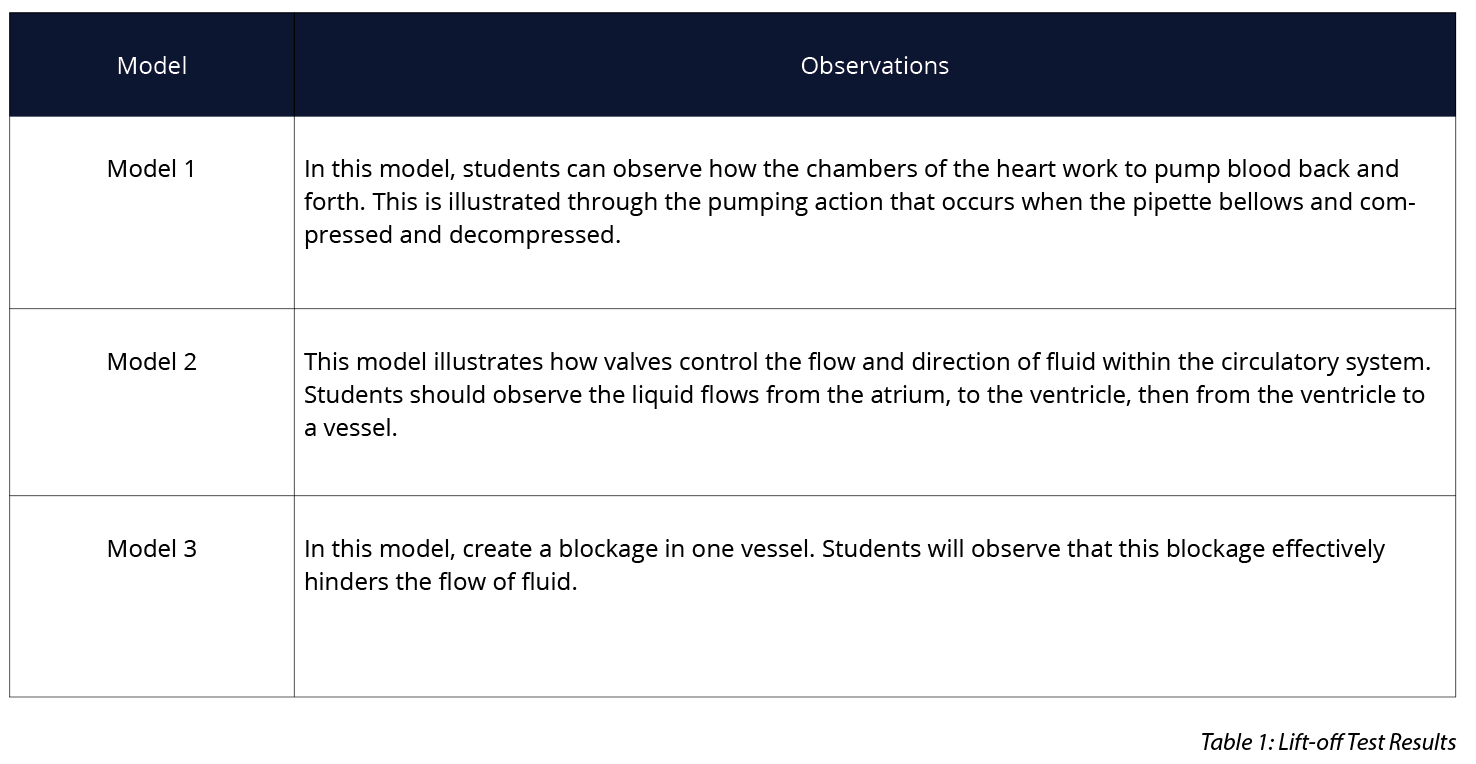
Describe your observations of each of the heart model in the table below. Include a full description of the movement of blood within the different components of the model.
INVESTIGATIONS
-
Based on their observations in this investigation, ask students to describe how vessels, heart valves, and the heart’s pumping action function together to circulate blood throughout the body.
- Challenge students to improve upon the model designs to better illustrate the human heart.
- Ask students to describe what happens when a vessel becomes blocked.
- Ask students to describe the difference between a closed-loop circulatory system and open circulatory system. Students should identify why a closed-loop circulatory system is suited to human bodies.
 Time Requirements
- 45 mins
 Material List
-
1 Tubing Clamp
- 32 Tubing (18")
- 4 Y Connectors
- Parafilm® squares
- 2 One-Way Check Valves
- 2 Bellows Pipettes, 7 mL
- Red Food Dye Solution
- Paper Towels or newspaper
 Safety Requirements
-
The red food dye solution will stain clothing and skin. Appropriate Personal Protective Equipment (PPE) must be worn at all times.
- Wash hands thoroughly before and after the investigation.
- Avoid any direct contact with the solution.

